Your dual dash cam just arrived and you’re staring at the cables wondering if you’re about to scratch something. Knowing how to install a dash cam front and rear is one of the easier DIY jobs on a car, and you don’t need any automotive experience. A shop charges $200 to $285 for this. With this guide, you’ll have both cameras running in under an hour, for free.
About 30% of U.S. drivers already use a dash cam, and 70% of all drivers think they should come factory-installed. Whether you’re protecting yourself from a false insurance claim or documenting a hit-and-run, a front and rear setup covers both directions. Here’s what you’ll walk away with:
- Both cameras mounted cleanly on your windshields
- Cables tucked and hidden, not loose across your dashboard
- Power connected and both cameras recording
- The knowledge to hardwire for parking mode if you want it
What You’ll Need (Tool Checklist)
Check your gear before you touch the car. A missing tool halfway through the job is the main reason installs get frustrating.
Tools Included in the Box
Most front and rear dash cam kits include: adhesive mount, suction cup mount (for the rear), power cable, rear camera cable, plastic pry tool, cable clips, and a cleaning wipe. Lay everything out now. If anything is missing, contact the seller before you start.
Additional Tools You May Want to Grab
- A second plastic trim removal tool (kit tools are often flimsy)
- Microfiber cloth and glass cleaner
- Alcohol wipes for the exact mounting spots
- Zip ties (for the liftgate grommet on SUVs and hatchbacks)
- A basic multimeter (only if you plan to hardwire)
- Your car’s owner manual (for fuse box location)
Time Estimate: How Long This Actually Takes
- Plug-and-play (cigarette lighter): 30 to 45 minutes
- Hardwired with parking mode: 60 to 90 minutes
- First-timers: Add 15 to 20 minutes
Block out 90 minutes and don’t rush on your first attempt.
Step 1: Mount the Front Camera
Finding the Right Spot on Your Windshield
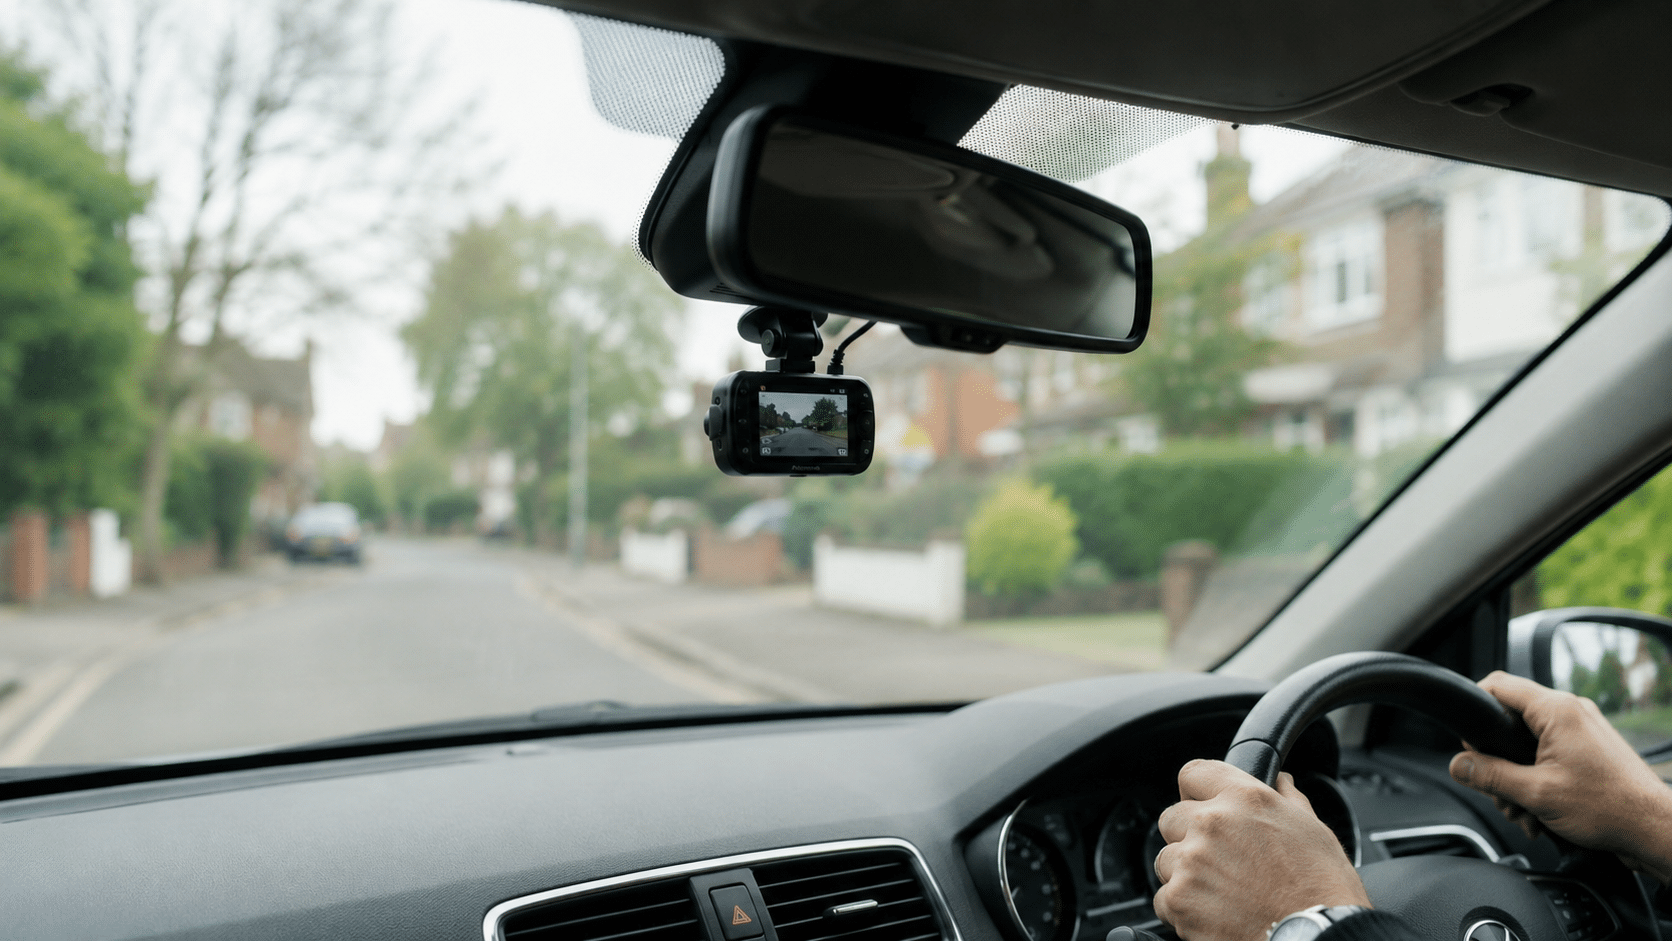
Mount the front camera directly behind the rearview mirror, centered on the windshield. This keeps it out of your direct line of sight while giving the lens a clear view of the road.
Two things to avoid:
- The frit area (the black dotted border around the windshield edge). Adhesive won’t bond well there.
- Mounting too low means the camera captures more hood than road. You want the horizon visible in the top third of the frame.
A handful of U.S. states have rules about windshield-mounted devices, so a 30-second search for your state’s laws is worth it before committing.
Cleaning and Prepping the Glass
Spray glass cleaner on the area and wipe it with a microfiber cloth. Follow up with an alcohol wipe on the exact mounting spot. Let it dry completely before attaching anything. Moisture under the adhesive weakens the bond significantly.
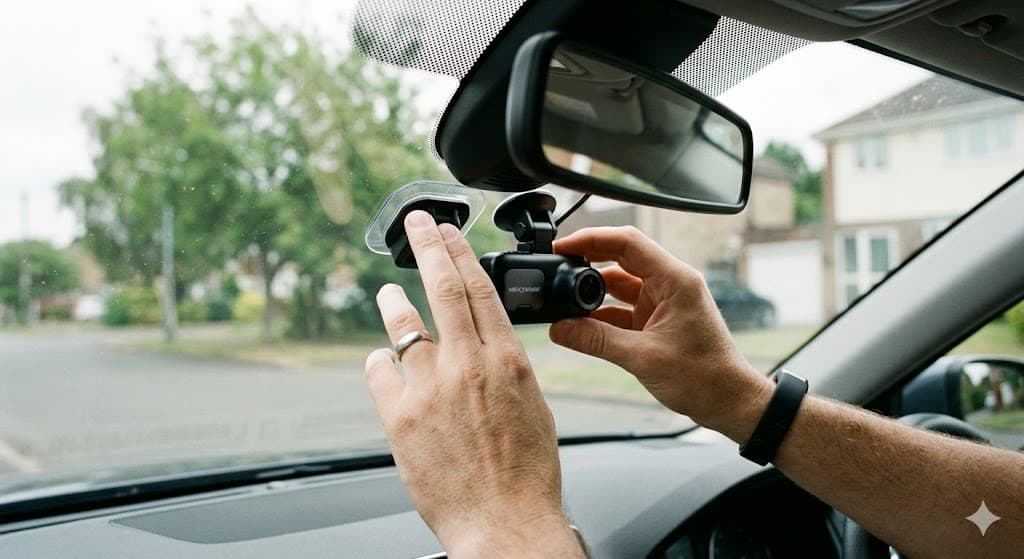
Attaching the Mount (Adhesive vs Suction Cup)
- If your kit includes a static cling film, apply it first. It protects your factory tint and makes repositioning easier later.
- Peel the backing off the adhesive pad.
- Press the mount firmly and hold for 30 seconds.
- For a suction cup mount, press firmly and lock the lever, then run a finger around the edge to confirm the seal.
Let the adhesive cure for at least a few hours before putting stress on it.
Step 2: Route the Power Cable
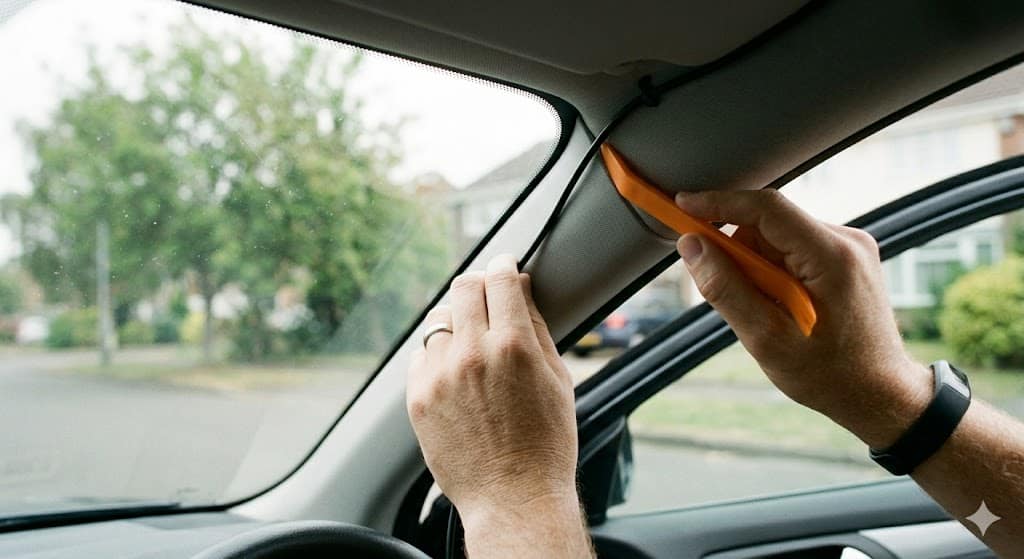
Tucking Wires into the Headliner
The headliner is the fabric ceiling panel. There’s a gap between it and the windshield frame edge where the power cable goes.
- Start at the camera and run the cable along the top of the windshield toward the passenger side.
- Use the plastic pry tool to lift the headliner edge gently. You’re not removing it, just creating a gap. The clips are fragile, so work slowly.
- Push the cable into the gap as you move toward the A-pillar.
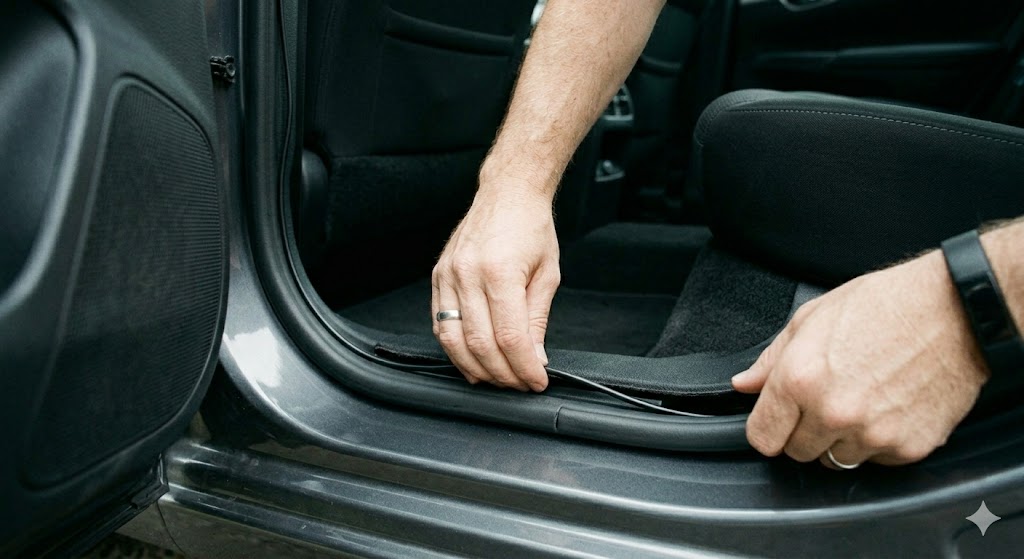
Running Down the A-Pillar (Passenger Side)
The A-pillar is the vertical post between the windshield and the front door. Use the passenger side to keep the cable away from the driver.
- Pull back the rubber door seal at the top of the passenger door opening.
- Tuck the cable behind the seal and push it down toward the floor.
- Work it behind the A-pillar trim, using the pry tool if needed.
Critical safety note: The A-pillar in most modern cars contains a side curtain airbag. Route your cable behind the airbag housing, along the inner edge of the trim, never across the face of the pillar. If you’re unsure where the airbag is, open the door and look at the pillar with the seal pulled back. The airbag module is typically white or grey. Your cable belongs on the opposite side of it.
Cigarette Lighter vs Hardwire Kit: Which Is Right for You?
Cigarette lighter (12V socket), easiest option: Continue tucking the cable under the dashboard trim and toward your 12V socket. Plug in, done. Parking mode won’t work with this setup, but it’s a clean starting point.
Hardwire kit, cleaner and more capable: Connect directly to the fuse box, enable parking mode, and get a wire-free look. It takes 15 to 20 minutes longer. Full instructions are in Step 6.
For your first install, start with the cigarette lighter. You can hardwire later once you know everything works.
Step 3: Install the Rear Camera
Best Placement on the Rear Windshield
Mount the rear camera at the very top center of the rear windshield. This gives you the widest view of the road behind you, above the headrests.
What to avoid:
- The defroster grid lines (horizontal lines across the rear glass). Adhesive may not bond properly to them.
- Too low means the camera captures your back seat, not the traffic behind you.
- Off-center means uneven field of view.
Mounting the Rear Unit
Clean the glass, apply the static cling film if included, then press the adhesive mount firmly for 30 seconds. Leave a little cable slack between the camera and where the cable exits toward the headliner. You’ll need that slack when routing through the liftgate grommet in the next step.
Running the Rear Cable to the Front Unit
Plug the rear cable into the camera first. Route it from the camera along the top edge of the rear window, tucking it into the headliner or trim gap.
The path from back to front: rear headliner edge > C-pillar (behind the rear door) > B-pillar (between front and rear doors) > front headliner > input port on the front dash cam.
Step 4: Route the Rear Cable (The Tricky Part)
This step separates a clean install from a messy one. The routing depends on your vehicle type.
Sedans vs SUVs vs Hatchbacks: Different Routing Paths
Sedans are the easiest. The rear window is fixed, so you can tuck the cable into the headliner from the rear camera all the way to the C-pillar, then follow the door seal path down to the sill and forward under the carpet.
SUVs and hatchbacks have a rear window that’s part of the liftgate, so you can’t route the cable straight from the body to the glass. You need to thread it through the rubber grommet that connects the body to the liftgate.
Trucks with a rear cab window route like sedans. If mounting a second camera at the back of the cab exterior, look for an existing rubber grommet in the cab wall rather than drilling a new hole.
Tucking Along the B and C Pillars
Pull back the rubber door seals on the passenger side starting at the rear. They peel away with your fingers (they’re held by friction and a metal channel, not clips). Tuck the rear cable behind the seals all the way down the C-pillar, then the B-pillar. Use the pry tool to lift the bottom edge of any trim panels; go gently because the plastic clips snap if you lever instead of pulling straight out.
Once the cable reaches the A-pillar area, bundle it with the power cable using a clip and continue to the front camera.
Handling the Rubber Grommet (Hatchbacks and SUVs)
Look for the rubber accordion tube on one side of the liftgate hinge. It already carries wires for the rear wiper, defroster, and brake light. Here’s how to get your cable through it:
- Peel the grommet away from the body; it’s held by a lip in a channel, so pull firmly.
- Thread the rear camera cable through alongside the existing wiring using a stiff wire or cable fish tool.
- Leave at least 6 to 8 inches of slack on both sides of the grommet. When the liftgate opens, it flexes. A taut cable will eventually snap the connector.
- Secure the cable to the existing wiring bundle with a zip tie.
- Push the grommet fully back into its channel.
Open and close the liftgate several times. If the cable pulls tight at any point, add more slack before calling it done.
Step 5: Connect Power and Test
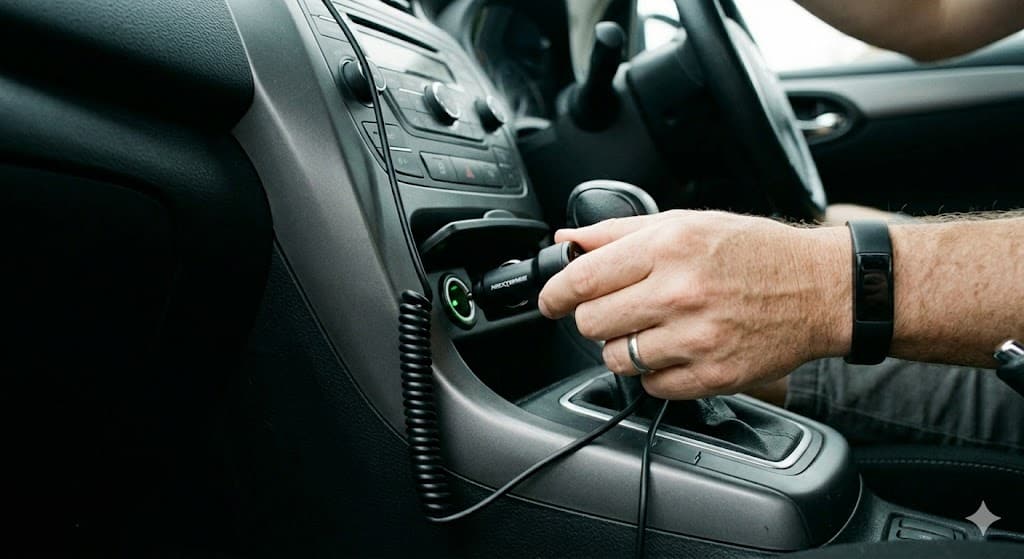
Plugging In and Powering On
- Connect the rear camera cable to the front dash cam’s input port (usually labeled “rear” or “CH2”).
- Connect the power cable to the front camera.
- If using the 12V socket, plug in the adapter. If hardwired, it’s already connected.
- Turn the ignition to accessory mode. The front camera should power on within a few seconds.
- Most cameras auto-detect the rear unit and show both feeds on screen.
If the rear camera doesn’t appear, check the cable connection at both ends before anything else.
Adjusting Camera Angles Using the App or Screen
Use the live view on the camera screen or the companion app via Wi-Fi.
Front camera: The horizon should sit in the upper third of the frame, with the hood just barely visible at the bottom edge. Tilt down if you see too much sky; tilt up if you see too much hood.
Rear camera: The road behind you should fill most of the frame, with the rear bumper just visible at the bottom. Take a short drive and verify that license plates are readable at normal distances.
Formatting the Memory Card
Don’t just insert the card and drive. Format it inside the camera first:
- Go to settings and select “Format SD Card.”
- The camera will structure the card for its own file system.
Use a UHS-I card or better from a trusted brand (SanDisk, Samsung, Lexar). A cheap or fake card causes silent recording failures. A 64GB card gives you a few hours of continuous footage before loop recording kicks in.
Step 6: Optional Hardwiring for Parking Mode
With the cigarette lighter, your cameras turn off when the car does. Hardwiring keeps them running at low power when parked, capturing motion or impacts while you’re away from the car.
What Is Hardwiring and Why Consider It?
A hardwire kit connects the dash cam to the car’s fuse box using three wires and two fuse taps. You want it if you need parking mode, prefer a completely cable-free look, or park in high-risk locations. If you only need recording while driving, the 12V socket is fine.
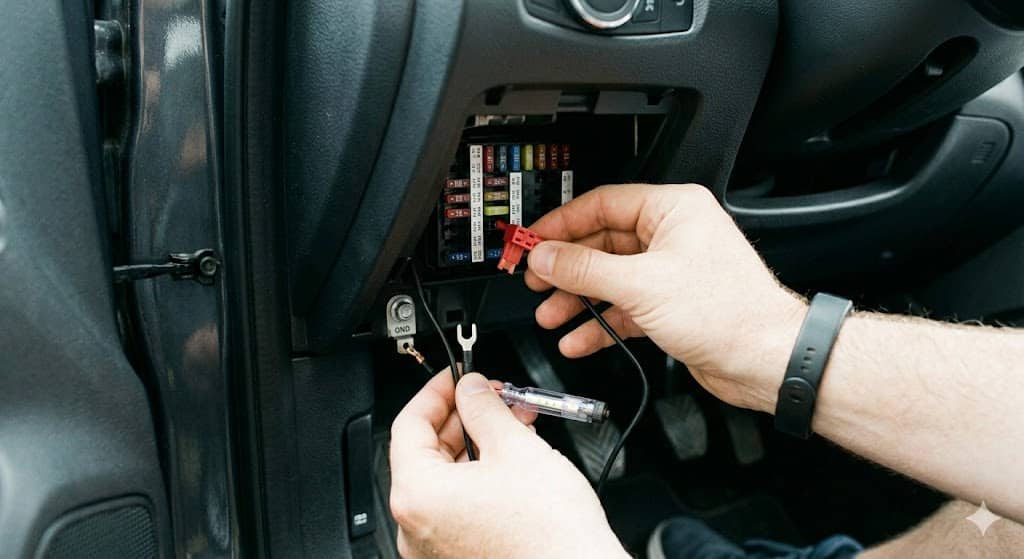
Locating Your Fuse Box
Use the interior fuse box under the driver’s side dashboard. It’s easier to reach than the engine compartment box and closer to the camera. Your owner manual shows the exact location and fuse layout.
Connecting ACC, Constant Power, and Ground
A standard hardwire kit has three wires:
- Red (ACC): Connects to a fuse that only has power when the ignition is on.
- Yellow (constant power): Connects to a fuse that has power even with the ignition off. This powers parking mode.
- Black (ground): Connects to a bare metal chassis bolt. Scrape away paint for a solid metal-to-metal connection.
Use the included fuse taps (add-a-circuits) to avoid cutting factory wiring. Pull the relevant fuse, insert it into one slot of the tap, insert a new 5-amp fuse in the other slot, and push the tap back into the fuse box. Repeat for both fuses. Connect the ground wire to a nearby chassis bolt.
To identify which fuse is which: with the ignition off, a constant power fuse shows 12V on both pins. With the ignition on, both ACC and constant power fuses show 12V. That’s the difference.
Setting Voltage Cutoffs to Protect Your Battery
Most hardwire kits have a voltage cutoff that shuts down the dash cam when the battery drops below a threshold, typically 11.6V to 12.2V. Set it on the higher end of that range. A camera missing a few hours of parking footage is a minor inconvenience; a dead battery is not.
If you park for multiple days at a stretch, turn parking mode off or set the cutoff high. In hot climates (Arizona, Florida summers), a dedicated dash cam battery pack handles heat better than your car’s battery and won’t drain it at all.
Common Mistakes to Avoid
1. Mounting the front camera too low or off-center. A low mount captures hood instead of road; an off-center mount misses one lane. Mock-mount the camera and check the live view before you peel the adhesive backing.
2. Routing cables in front of the A-pillar airbag. The side curtain airbag deploys outward at high speed. A cable in its path either blocks deployment or becomes a projectile. Route behind the airbag housing, never across the face of the pillar. If the trim won’t allow it, run the cable along the bottom edge where no airbag is present.
3. Forgetting slack in the liftgate grommet. The rear cable flexes every time you open the trunk. Leave at least 6 to 8 inches of extra cable on each side of the grommet, or the connector will eventually fail.
4. Skipping the memory card format. A new card from the store is structured for general file storage, not loop recording. Skipping the in-camera format leads to a camera that appears to work but saves nothing, or locks up when the card fills with improperly structured files.
Troubleshooting Quick Fixes
Camera Won’t Power On
- Is the power cable fully seated? These ports can feel clicked before they’re locked.
- Is the ignition on (if using the 12V socket)?
- Check the small glass fuse inside the tip of the lighter adapter.
- If hardwired, use a multimeter to confirm the fuse taps have power and the ACC tap is on an accessory circuit, not a constant one.
Rear Camera Not Detected
- Unplug and re-plug the rear cable at both ends.
- Inspect the cable for damage, especially where it passed through the grommet.
- Power cycle the front camera completely. Some cameras need a reboot to detect a newly connected rear unit.
- Check the settings menu for a rear channel or input enable option.
Blurry or Dark Footage
- Clean both lenses with a microfiber cloth first. Fingerprints are the most common cause.
- Confirm the recording resolution is set to the maximum in the settings menu.
- If rear footage is blurry near the bottom, reposition the camera above the densest defroster lines.
- For low-light performance, image sensor quality matters more than resolution. Cameras with a Sony Starvis or Starvis 2 sensor perform noticeably better after dark.
Parking Mode Not Working
- Parking mode requires constant power. The cigarette lighter cuts power with the ignition.
- If hardwired, verify the yellow wire connects to a fuse that shows 12V with the ignition fully off.
- Check the settings menu. Parking mode is off by default on most cameras.
- If the camera shuts off after an hour, the voltage cutoff is triggering. Lower the cutoff threshold or charge your battery.
FAQs
Can I Install a Dashcam by Myself?
Yes. If you can stick something to a windshield and tuck a cable out of sight, you’re qualified. The plug-and-play setup takes under 45 minutes on your first try. The only step that needs care is routing cables past the A-pillar airbag, which is covered above.
Do Dashcams Drain Car Batteries?
Not when set up correctly. Through the cigarette lighter, the camera turns off with the ignition. With hardwiring and parking mode, every quality hardwire kit includes a voltage cutoff that prevents the battery from dropping to a damaging level. Set the cutoff correctly and battery drain is not a concern.
Do I Need to Tell My Insurance If I Get a Dash Cam?
Most insurers don’t require it. Some offer small discounts, so it’s worth a quick call. The practical benefit is that 40% of dash cam owners have already captured a crash or incident on video, and half of those clips have been used in insurance claims. Footage doesn’t automatically lower your premium, but it can win a dispute that would otherwise go against you.
How Much Does Professional Installation Cost?
A shop or mobile installer typically charges $200 to $285 for front and rear, with front-only starting around $85. This guide gives you the same result for free, and you’ll know exactly where every cable is if you ever need to adjust it.
Is There a Downside to Having a Dash Cam?
Not meaningfully. There’s a small device on your windshield. Some adhesive mounts leave faint residue when removed. A few models have LEDs that glow at night; check your settings menu, as most let you disable them. The tradeoff of having video evidence after an accident or hit-and-run is worth far more than any of those minor inconveniences.
Final Thoughts
Installing a front and rear dash cam yourself is straightforward once someone explains the steps clearly. You mount two cameras, route the cables out of sight, plug in, and test. The parts that seem difficult (cable routing, the liftgate grommet, fuse box hardwiring) all have simple, defined solutions.
Start with the cigarette lighter. It works, it’s reversible, and it takes 30 to 45 minutes. Once you’re happy with the placement and footage, come back and hardwire it for parking mode when you’re ready.
Take a short test drive before committing anything permanently. Check both feeds. Adjust the angles. Format the memory card. Then drive knowing you’ve got eyes in both directions.
The global dash cam market is projected to grow from $4.4 billion in 2024 to $10.75 billion by 2034. More drivers keep discovering what you just did: this is a simple, useful piece of gear. You installed it yourself, saved a couple hundred dollars, and you know exactly how it works. That’s a solid afternoon.