You bought the robot lawn mower. You’re picturing cold drinks on the porch while a little machine does the work. Then you see the spool of wire. Suddenly it feels like a weekend project you’d rather skip.

Don’t panic. Learning how to install wire for a robot lawn mower isn’t rocket science. This guide covers planning, laying, testing, and troubleshooting your boundary wire. For most large lawns, expect a few solid hours rather than a three-day saga.
What Is Boundary Wire and Why Does Your Robot Mower Need It?
Boundary wire is a thin, low-voltage cable connected to the charging station. It sends a magnetic signal that the mower’s underside sensors detect. When the robot gets close, it slows down, turns around, and stays inside your zone. It defines the mowing area, blocks hazards like ponds, and helps the mower find its way home when the battery runs low.
Do All Robot Mowers Need a Boundary Wire?
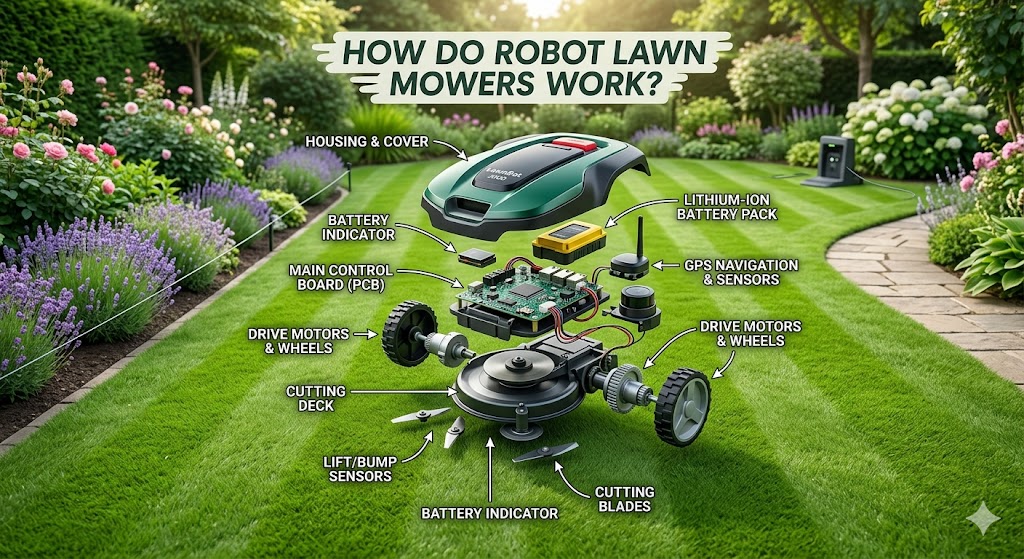
No, but most do. According to Mordor Intelligence, boundary-wire guidance still held roughly 65% market share in 2025. Entry-level and mid-range models use it because it’s reliable, affordable, and works under thick tree cover where GPS gets spotty. Wire-free models use GPS, cameras, and AI instead, but they cost more and need a clear view of the sky. For large lawns, a wired model often gives better coverage and a smaller dent in your wallet. Read our companion guide on how robot lawn mowers work for the full picture.
Tools and Supplies You’ll Need
Gather these first. Running back to the garage ten times kills momentum.
- Boundary wire. Most mowers include a starter roll. Large lawns need extra cable in 100m, 200m, or 650m rolls. Extend with waterproof connectors.
- Wire pegs or lawn staples. Usually in your kit.
- Pliers. For connectors and stripping wire ends.
- Small garden spade. Only if burying the wire.
- Mallet or hammer. For driving pegs.
- Long string line. Keeps wire straight.
- Smartphone. For the mower’s app during setup.
- Optional: wire-laying machine, splicing kit, extra connectors, wire break detector.
Step 1: Plan Your Layout (Don’t Skip This!)
Thirty minutes of sketching saves three hours of re-laying wire later. I’ve learned this the hard way. You don’t want to discover your wire crosses itself after pegging down five hundred feet.
Sketch Your Lawn
Draw your property boundaries, house, driveway, beds, trees, ponds, and paths. Mark the charging station. The boundary wire must form one continuous loop and cannot cross itself. Plan “islands” around obstacles by running the wire from the edge to the obstacle, looping around it, then running straight back alongside your first line. Those parallels cancel each other, so the mower crosses the return wire while staying blocked from the obstacle.
Call Before You Dig
In the US, call 811 before digging. It’s free, legally required in most states, and keeps you from slicing a gas line. A locator marks underground utilities within a few business days. Plan ahead.
Mow First
Cut grass short before installation. Short grass lets the wire sit flush and helps pegs anchor firmly. Trim edges carefully for accurate boundary measurements.
Step 2: Place the Charging Station
Pick a flat, level spot near an outdoor outlet, ideally within thirty feet. The station needs clear space in front so the mower drives in easily. Give it side clearance too.
Consider sun and rain. Some owners build a small shelter or buy a mower garage. Position the station near the lawn’s center if possible.
Step 3: Lay the Boundary Wire
Start at the charging station and leave a couple feet of extra wire for connections. Work around the perimeter, pegging the wire at regular intervals. Keep it taut. A loose wire sticks up, catches wheels, and looks sloppy.
Above Ground vs. Buried: Which Is Better?
Above ground is faster. Peg the wire every few feet with kit staples. Grass grows over it within weeks. The downside is exposure: scarifiers, trimmers, and squirrels can damage it. Repairs are easy though.
Buried wire goes into a shallow furrow one to two inches deep. It protects against weather and tools, and looks cleaner. Repairs require digging. Many pros recommend an above-ground test run for two to three weeks, then burying it once you’re happy. For very large lawns, consider renting a cable-laying machine.
Spacing from Edges and Obstacles
Typical guidelines: keep wire about fourteen inches from walls and tall stones. Beds, hedges, and ground-level paths need about four inches. Ponds demand about fourteen inches; add a physical barrier if the drop-off is steep. In corners, lay the wire in a gentle curve since sharp angles confuse the robot. On slopes, run the cable diagonally to prevent sliding.
Creating Islands for Flower Beds and Trees
Any mid-lawn obstacle needs an island. Run the wire from the nearest edge to the obstacle, loop around it, then run straight back alongside your first line about four to twelve inches apart. That parallel pair cancels the signal, creating an invisible bridge. Never let the wire cross itself. A crossing creates a dead zone where the mower gets confused.
Step 4: Install the Guide Wire
A guide wire is a highway home for your mower. It’s a second wire running from the charging station to the lawn’s far reaches. When the battery gets low, the mower locks onto this guide and follows it straight back instead of wandering randomly.
On large lawns, a guide wire is practically essential. Without one, your mower might spend twenty minutes hunting for the station, draining the very battery it’s trying to save. Lay it from the station across the lawn to your most distant zone. Some models let you branch guides to multiple zones. Certain Husqvarna models won’t return home properly without one.
Step 5: Connect and Test Everything
Connect the boundary and guide wires to the charging station per your manual. Most use clamp or screw terminals. Plug in the station, power it up, and open the mower’s app to run a loop test. Most apps immediately report if the wire loop is closed.
Place the mower in the station, let it charge fully, then send it on a short test mow. Walk the perimeter and watch how it behaves near the wire. If it stops too far from an edge, move that section closer. If it crosses a boundary, check for a break or loose peg. Tweak until everything behaves.
How Long Does Installation Take? (DIY vs. Professional)
According to Husqvarna, a typical robotic mower installation ranges from two to five hours. For one acre or more, plan a full day. Burying the wire doubles the estimate.
A professional installation usually costs a few hundred dollars but saves your weekend and includes fine-tuning. Pros have wire break detectors, cable-laying machines, and experience spotting problems early. If your lawn has complicated obstacles or steep slopes, a pro is worth considering.
Either way, the effort is one-time. After that, your robot runs on autopilot for years.
Common Problems and Quick Fixes
Even with careful planning, things go wrong.
Wire break. The mower stops or the app throws a loop error. For above-ground installs, visually inspect for damage. For buried wire, a break detector saves hours. Find the break, strip the ends, and splice with waterproof connectors.
Mower stops too far from edges. Your wire sits too far from the boundary. Move it closer, but don’t hug retaining walls or the mower might drive off the edge. Find the sweet spot through small adjustments during testing.
Signal interference. If a neighbor also runs a wired mower, signals can cross. Most mowers let you change the transmitter frequency in settings.
Guide wire not found. Check charging station connections first. Then make sure your guide wire isn’t pegged down next to a boundary loop that cancels its signal.
FAQs
Do all robot mowers need a boundary wire?
No. Many still use one, but newer wire-free models navigate with GPS, cameras, and AI. Wired models are generally cheaper and more reliable under dense tree cover.
How deep should I bury the wire?
Robomow recommends a laying depth of one to two inches (four to five centimeters) as ideal. The mower detects signals up to about seven centimeters deep, but shallower depths give more accurate edge cutting.
Can I install the wire above ground?
Yes. Use the pegs or staples from your kit. Grass grows over the cable in a few weeks. Watch out for scarifiers and string trimmers.
How much wire do I need for 1 acre?
According to industry estimates, roughly one thousand feet covers about one acre of perimeter. Buy extra. Running out mid-project is deeply frustrating.
What happens if the wire breaks?
The mower usually stops and alerts you via the app. Find the break, strip the damaged ends, and splice them with waterproof connectors. A wire break detector makes this much faster on large lawns.
Should I hire a professional or do it myself?
If you have a straightforward lawn and a free Saturday, DIY is doable. If your property is large, heavily landscaped, or you hate yard work, hire a pro.
Wrapping Up
Installing boundary wire feels intimidating at first. But once you break it into steps and peg that first section down, the rest flows naturally. Before long, your robot cruises the yard while you relax. That first quiet evening, watching your mechanical landscaper work while you do nothing, is when you’ll realize those hours of wire work were worth it.
Leave a Comment
You must be logged in to post a comment.